Automating Linters and Tests on a JavaScript App using GitHub Actions 🤖

I'm a Software Engineer, I thoroughly enjoy writing articles about various development topics, obstacles, and challenges that come my way
When you're working on a project that contains other developers where each of you has a different background, and different coding style.
The style of the code should be consistent across all the project files, that's why tools like ESlint & Prettier are usually used with almost every serious JavaScript project.
When one of the team members doesn't lint their code before PR to main, or his new code fails a few tests or maybe broke the building process, you don't want to review trivial stuff like these!
You can automate all of that by using GitHub Actions.
Continuous Integration using Github Actions!
Creating the Workflow File
After you had ESlint installed, and prettier configured with ESlint.
Create .github/workflows/{myWorkflow}.yml at the root of your project
$ touch ./.github/workflows/tests.yml
Once you open the file, you can name your workflow like this.
name: CI:Tests
This is the name of the workflow that will appear on your repo actions
Events
Now specify what events should trigger that workflow in the on: block, in my case I want it to be triggered each time someone opens a new Pull Request to the main branch.
you can check other events on this page of the official documentation
name: CI:Tests

on:
  pull_request:
      branches: ['main']
if you're using multiple branches for development and testing, you can do something like:
name: CI:Tests

on:
  pull_request:
      branches: ['main', 'development', 'QA']
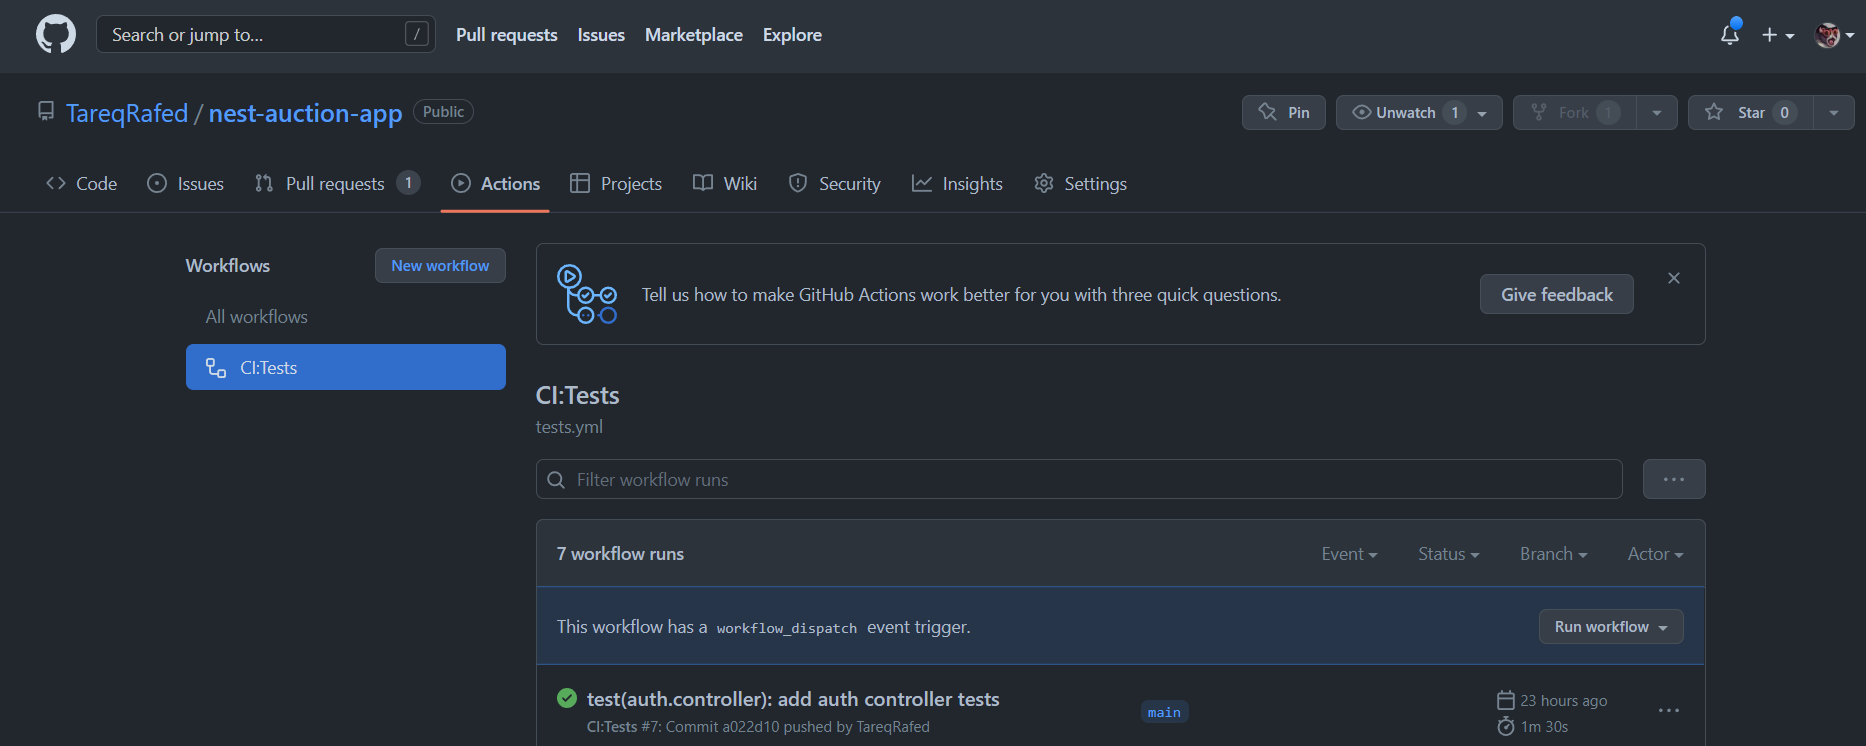
Also, you can allow the workflow to be manually triggered from the Actions page (check the last screenshot) if you add workflow_dispatch: in the on: Block after the event name, so the file becomes
name: CI:Tests

on:
  pull_request:
      branches: ['main', 'development', 'QA']
  workflow_dispatch:
Jobs
it's time now to place the needed actions for the above events!
adding jobs: block, allows us to perform the actions, each job contains steps, and while these steps are performed in order, each job is independent and performed in parallel by default.
the first job is "lint" (you can name it whatever you want), so add this under the jobs: block
name: CI:Tests

on:
  pull_request:
      branches: ['main', 'development', 'QA']

jobs:
  lint:
You must specify what machine the job should work in, since the commands I will use will run on node js, which is available on almost every OS, I will just stick with the latest stable ubuntu image.
You can also check available images here docs
name: CI:Tests

on:
  pull_request:
      branches: ['main', 'development', 'QA']

jobs:
  lint:
    runs_on: ubuntu-latest
After that, we finally can add the steps, our first step would be to checkout to the current repo, since this step is always duplicated, we can use ready actions by GitHub or the community using the keyword uses, for this, we will add actions/checkout@v3 which is a predefined action to checkout for the current workspace, you can learn more about it here
name: CI:Tests

on:
  pull_request:
      branches: ['main', 'development', 'QA']

jobs:
  lint:
    runs_on: ubuntu-latest
  steps:
    # First Step
  - name: Checkout the repo
    uses: actions/checkout@v3
By default, the last image contains the last nodejs stable version, but you can also specify a specific node version using actions/setup-node@v3
We will add another step to set up a specific nodejs version, as well as a feature it provides, which is caching the package manager dependencies where you only have to specify your package manager.
using the with: block which allows passing data to the action that is used in uses:
Note that each step should have at least a uses: or a run:
name: CI:Tests

on:
  pull_request:
      branches: ['main', 'development', 'QA']

jobs:
  lint:
    runs_on: ubuntu-latest
  steps:
    # First Step
    - name: Checkout repo
      uses: actions/checkout@v3

    # Second Step
    - name: Install nodejs
      uses: actions/setup-node@v3
      with:
        # the specific node-version
        node-version: 16
        cache: 'yarn'
the last step before starting running ESlint & Prettier is to install dependencies
name: CI:Tests

on:
  pull_request:
      branches: ['main', 'development', 'QA']

jobs:
  lint:
    runs_on: ubuntu-latest
  steps:
    # First Step
    - name: Checkout repo
      uses: actions/checkout@v3

    # Second Step
    - name: Install nodejs
      uses: actions/setup-node@v3
      with:
        # the specific node-version
        node-version: 16
        cache: 'yarn'

    # Third Step
     - name: Install dependencies
       run: yarn --frozen-lockfile
Note that --frozen-lockfile flag was added so the lock file doesn't get modified.
Finally, We will run the linting scripts
in my package.json I have:
"scripts": {
...
    "lint": "eslint \"{src,apps,libs,test}/**/*.js\" ",
    "format": "prettier --write \"src/**/*.ts\" \"test/**/*.ts\"",
...
}
name: CI:Tests

on:
  pull_request:
      branches: ['main', 'development', 'QA']

jobs:
  lint:
    runs_on: ubuntu-latest
    steps:
      # First Step; Checkout to the currnet Workspace
      - name: Checkout repo
        uses: actions/checkout@v3

      # Second Step; install specific Nodejs version & cache yarn dependencies
      - name: Install nodejs
        uses: actions/setup-node@v3
        with:
          # the specific node-version
          node-version: 16
          cache: 'yarn'

      # Third Step
       - name: Install dependencies
         run: yarn --frozen-lockfile

      # Fourth Step
       - name: Lint
         run: yarn lint && yarn format
We can also add another job to run unit tests, We will also add needs: to the job, which allows the job to hold until the mentioned jobs finish.
Note that since each job is independent, we will have to repeat the first 3 steps on the lint job.
name: CI:Tests

on:
  pull_request:
      branches: ['main', 'development', 'QA']

jobs:
  lint:
    runs_on: ubuntu-latest
    steps:
      # First Step; Checkout to the currnet Workspace
      - name: Checkout repo
        uses: actions/checkout@v3

      # Second Step; install specific Nodejs version & cache yarn dependencies
      - name: Install nodejs
        uses: actions/setup-node@v3
        with:
          # the specific node-version
          node-version: 16
          cache: 'yarn'

      # Third Step
       - name: Install dependencies
         run: yarn --frozen-lockfile

      # Fourth Step
       - name: Lint
         run: yarn lint && yarn format

  tests:
    runs_on: ubuntu-latest
    # Wait for lint job to finish before running this one
    needs: lint
    steps:
      - name: Checkout repo
        uses: actions/checkout@v3

      - name: Install nodejs
        uses: actions/setup-node@v3
        with:
          # the specific node-version
          node-version: 16
          cache: 'yarn'

       - name: Install dependencies
         run: yarn --frozen-lockfile

      # Fourth Step
       - name: Run unit tests
         run: yarn test
And that's it, after pushing these new changes to the main branch of your repo. GitHub will start running these tests on each PR that attempts to merge with the specified branches.
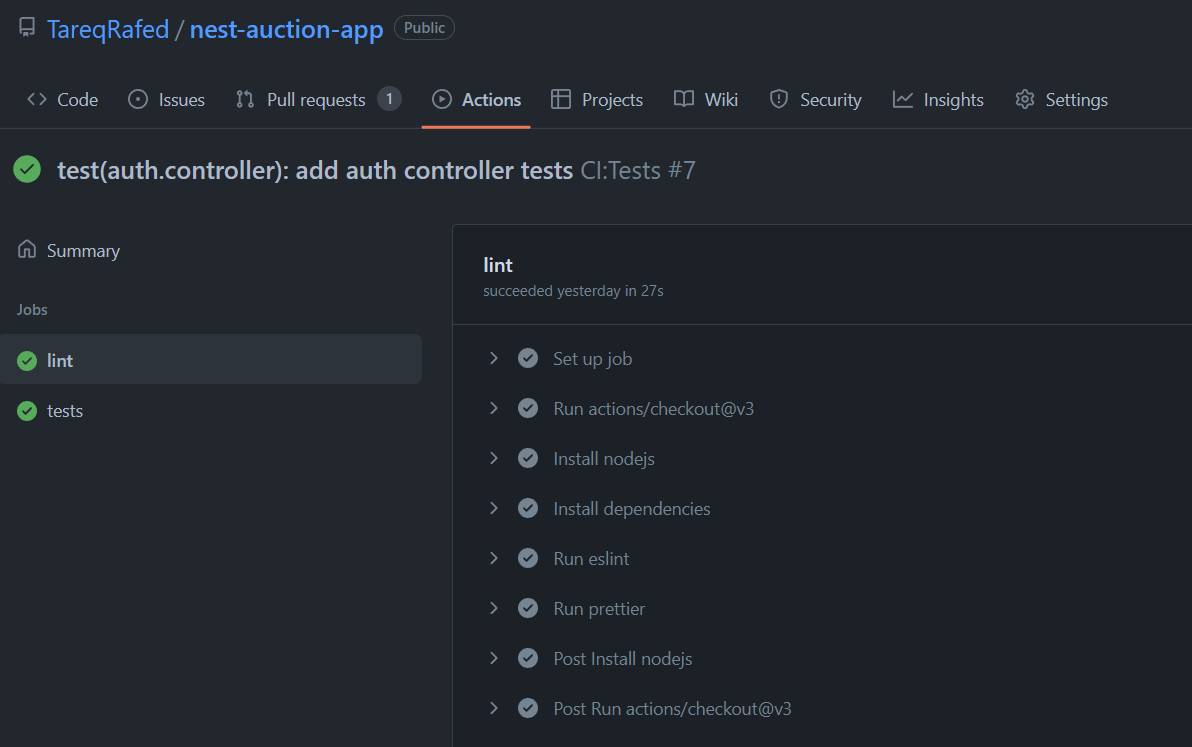
You can test it by creating a new PR, then checking Repo actions, and clicking on the name of the workflow to see the action output
Live Example
You can check this repo as an Example
Feel free to share this article, leave a comment or raise any questions.